Table of Contents
Amazon Music is a great tool for listening to music on the go and getting access to your favorite songs and albums conveniently.
That being said, you may switch to some other music streaming app such as Spotify and might be wondering how you can delete Amazon Music.
In this post, we’ll go over how you can uninstall Amazon Music completely from Windows, Mac OS as well as Android and iOS phones.
Quick Summary
The process for removing Amazon Music on any platform is pretty much the same as with any other tool.
- With Windows, you would use the Uninstall tool from the Control Panel.
- With Mac OS X, you can simply drag it to Trash
- With Android, you can use the App Manager.
- With iOS, you can simply touch and hold the app and tap “Remove app”
For step-by-step guides on how to uninstall Amazon Music from each platform, keep reading this post…
Uninstalling Amazon Music from Windows 10
You can uninstall Amazon Music from Windows 10 as you would any other tool or software.
Step 1: Go to the search bar in the taskbar below, type “Control Panel” and navigate to it.
Step 2: Click on “Uninstall a Program” in the Programs section as shown:
Please note that if your Control Panel is in a different view, simply change it to Category view through the drop-down menu on the top-right as shown:
Step 3: Find Amazon Music from the list of programs and double-click it. This will start the uninstallation process. Just follow the steps until Amazon Music is uninstalled from your PC.
Uninstalling Amazon Music from Mac OS
Step 1: Open up the Activity Monitor by going to your Applications folder and then to your Utility folder. From there, double-click on Activity Monitor.
Step 2: In the Activity Monitor window, find Amazon Music and select the “Force Quit” button.
Step 3: Open your Applications folder again, find Amazon Music and drag it to Trash.
Step 4: Open up a Finder window by pressing Option + Command + Space. This will open up a “Searching This Mac” window.
Step 5: Enter Amazon Music into the search bar in order to find any Amazon Music files or folders that may have been leftover and delete them.
Uninstalling Amazon Music from Your Android Phone
Important note: If you wish to cancel your Amazon Music subscription as well, do not uninstall Amazon Music before doing so. This is because you cancel your subscription through the app.
There are two ways of deleting Amazon Music on Android depending on the Android version of your phone.
Method 1: Dragging and Dropping
This method is relatively simple. Here are the steps you need to follow:
Step 1: Navigate to where the Amazon Music icon is located on your phone and long-press it.
Step 2: On the upper-right corner of the screen, you’ll see the option “Uninstall”, simply drag the icon up the Uninstall option.
Step 3: Confirm that you want to uninstall the app.
Method 2: Using the App Manager in Settings
You can use this method if the first method did not work for you.
Step 1: Start by going to Settings.
Step 2: Within Settings, Tap “Apps and Notifications” as shown:
Step 3: Within the Apps and Notifications menu, select “See all X apps” as shown:
Step 4: Find and select Amazon Music and then tap “Uninstall”.
It should be noted that you can use both of these methods to uninstall any unwanted application on your Android phone.
Uninstalling Amazon Music from iOS
It’s extremely simple to delete Amazon Music from iOS.
Step 1: Navigate to where the app is located on your iPhone.
Step 2: Touch and hold the app.
Step 3: Click on “Remove App”.
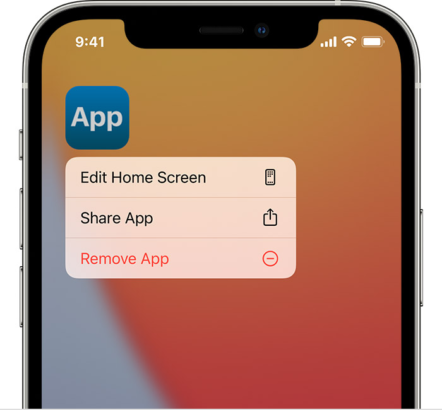
Step 4: Tap “Delete App” and then tap “Delete” to confirm the uninstall process.
You can use this same method not just to uninstall Amazon Music but any unwanted application within your iPhone.
Cancelling Amazon Music on Your Desktop
If you’re uninstalling Amazon Music from your machine, it’s more than likely that you’ll be wanting to unsubscribe from Amazon Music as well.
Here’s how you can cancel Amazon Music on your desktop after you have gone through the uninstall process.
Step 1: Open up your default web browser.
Step 2: Go to Amazon.com
Step 3: Hover your cursor over Account & Lists on the top-right part of the page as shown:
Step 4: Within the “Your Account” drop-down menu, click on Memberships & Subscriptions as shown:
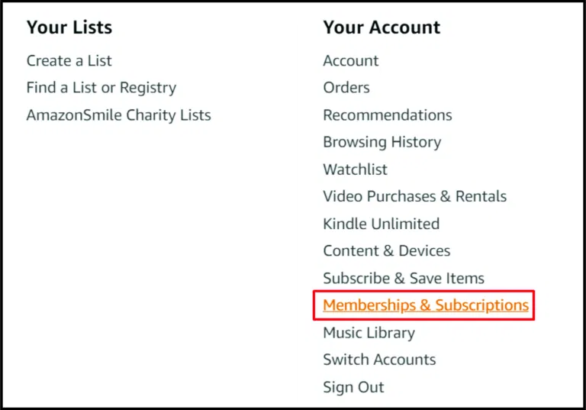
Step 5: In the lower part of the screen, click on “Music Subscriptions”.
Step 6: On the next screen, go to the Amazon Music Unlimited Section as shown:

Step 7: Click on “Cancel Subscription” underneath the “Subscription Renewal Details” section as shown and then click on “Confirm cancelation”.
And with that, you’ve succeeded to uninstall Amazon Music and canceling your subscription as well.
It’s important to note that you can still access all of your Amazon Music content if you want until the subscription end date.
Canceling Amazon Music on Android
Here are the steps you can take to cancel your Amazon Music subscription on your Android or another non-iOS device.
Step 1: Open the Amazon Music app.

Step 2: Tap the gear icon on the top-left part of the screen as shown:
Step 3: Select “Amazon Music Unlimited” in the Your Account section as shown:
Step 4: In the plan information menu, navigate to the “Subscription Renewal” section and click on “Cancel subscription” as shown.
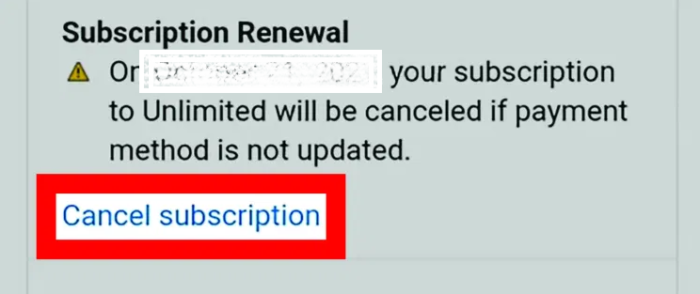
Step 4: Confirm your cancelation.
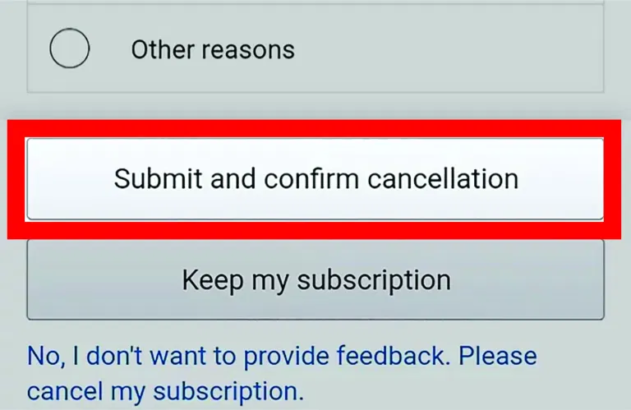
Once you have canceled your subscription, you can uninstall Amazon Music using the methods we’ve described for Android devices above.
Canceling Amazon Music on iOS
Unlike Android, you cannot unsubscribe from Amazon Music through the app on iOS.
Instead, you need to do so through your iPhone’s (or iPad’s) web browser.
Here are the steps you need to take:
Step 1: Open up your default web browser.
Step 2: Go to Amazon.com.
Step 3: Sign in to your account and go to Settings by clicking the three horizontal lines in the top-left part of the screen as shown:

Step 4: Navigate to “Account settings” as shown:
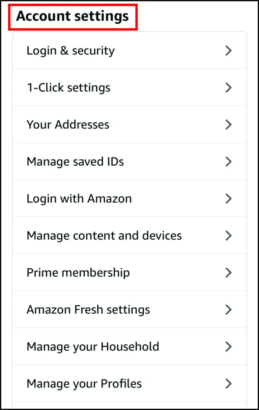
Step 5: Go to “Your Memberships & Subscriptions” as shown:
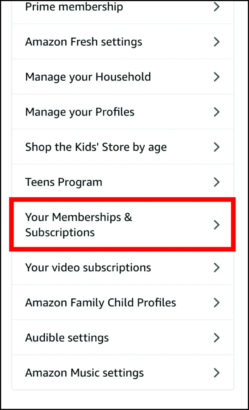
Step 6: Find Amazon Music Unlimited from the list and select it.

Step 7: Find and select the option that says “Amazon Music Unlimited Settings”.
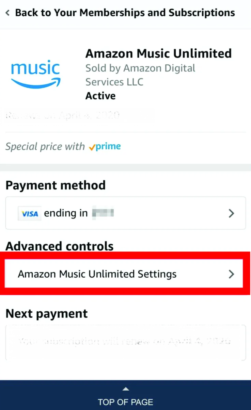
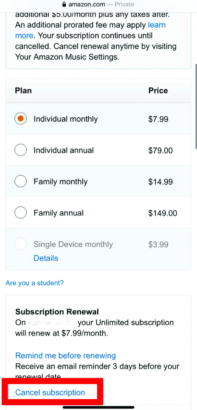
Step 8: Tap “Cancel Subscription”.
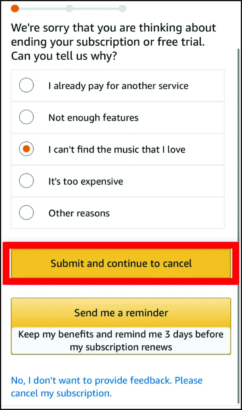
Step 9: Confirm your cancelation.
Frequently Asked Questions (FAQs)
Can I Pause My Amazon Music Account Rather than Canceling it?
So far, there’s no way to do this.
You can cancel your Amazon Prime subscription and still be able to use it until your payment date according to your subscription.
However, when it comes to the 90-day trial period, you cannot use the rest of your days of the trial if you cancel it.
Why Am I Still Getting Emails from Amazon Music Even Though I’ve Unsubscribed?
Sometimes, this may happen even though you’ve uninstalled and unsubscribed from Amazon Music.
In order to stop these emails, just open up the email and look for the “Unsubscribe” option.
This option is typically located at the bottom of the email in fine letters.
Why is Amazon Music Still Occupying Disk Space Even Though I’ve Uninstalled it?
Sometimes, when you uninstall tools or software, some of their documents or preference files can be left behind on your computer.
To remove these files, you can go to the temporary folder by searching for “%temp%” and deleting all of the files within.
You should also check if Amazon Music is still present in your Recycle Bin or Trash folder. If that is the case, simply delete it from there.
Is Spotify Better than Amazon Music?
While both of them are music streaming services, their business and customer model tends to differ a lot.
For example, Amazon Music has many more subscription options and you can buy digital copies of albums and songs on Amazon Music.
On the other hand, with Spotify, you get unlimited access to all of the songs available in its database with just your subscription. However, you technically don’t “own” any of the songs or albums within it.
Wrapping Things Up…
This brings us to the conclusion of our post on how to uninstall Amazon Music.
We’ve compiled information on all the popular user platforms and we hope you were able to find the solution for whatever platform you have.
What do you think of Amazon Music? Let us know in the comments below.


